|
Vaughan Family Timestream® Maps |
| Home Biography People Places Multimedia: Making It Work On the Water Writings/Presentations |

Photoshop Tricks
Dithering Images to the Netscape Palette Using Photoshop Palettes
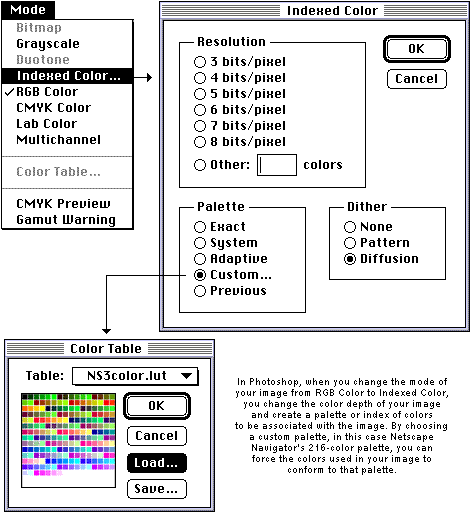
When you change mode to Indexed Color in Photoshop, you must specify the color depth of the converted image, the color palette to be used, and whether the colors of your image should be dithered (Diffusion or Pattern) or not (None). Here is the mode changing dialog from Photoshop 3.0.x, where the custom Netscape Navigator palette for Windows has been selected:

Netscape offers only 216 non-dithering colors in its palette for the Windows version of Navigator running in 8-bit display mode (about 20 colors are reserved for the Windows desktop, and 20 for Netscape's desktop and animated logo). Using the ns3 custom palette for your GIF image means that viewers using a Windows platform with a 256-color VGA monitor will see an image not further dithered by the Netscape application at runtime -- the 216+ colors that make up the image are exactly those already in Navigator's palette. Running on Macintosh platforms, however, Navigator uses the full 256-color Macintosh system palette. So images saved in Photoshop's System palette will display without dithering on Macintoshes. Images dithered to the Macintosh System palette run the risk of using one or more of the 40 special colors for Windows, which may then be dithered by Navigator on Windows platforms and may cause strange effects. Images saved with the Netscape custom palette will always display the same in Netscape Navigator on both platforms.
Photoshop Suggestions
Here are suggestions for using Photoshop to edit and save an image for use on the World Wide Web. If you use a different image editing application, follow the same logic and use the commands appropriate for that application. Always work in native Photoshop format using .PSD files -- these images are typically in RGB mode and use the maximum color depth. They are larger, but contain more information that can be usefully processed when resizing and dithering, and you will get better final results; they also contain layers, a very useful application feature. Use images at 72 pixels per inch resolution. When you convert a 24-bit RGB image to an 8-bit image (change its mode), you lose huge amounts of color information that cannot again be retrieved - the fine data are gone forever. So do all of your image manipulation (such as resizing, sharpening, and hue adjustments) in RGB mode, and save this source image in RGB mode as a .PSD file (not a lossy compression, like JPEG) so you can make changes later.
When you are satisfied with your image and ready for saving it as a GIF file, archive it as described above so if you make any mistakes while converting modes or saving, you will still have the original, complete with any layers you might have used. To be very safe, duplicate the original file and open the copy before saving to other formats.
Saving an 8-bit GIF File
To save a GIF file using Photoshop, you must first set the mode of your image to "Indexed Color," converting it to the best 8-bit palette (256 colors) that will represent the image and be displayed well by Web browsers -- you might also convert to 4-bit and one-bit images to minimize file size. Note that the option of saving a Photoshop 24-bit RGB file in GIF format will not be available in Windows and it will be grayed out on the Macintosh menu until you have converted your image to 8-bit mode: GIF is only for 8-bit images. Only one palette can be active at a time on an 8-bit computer monitor.
